Showing posts with label Recipes. Show all posts

Monday, 21 March 2016

Beet Brioche Couronne


Back in the UK I watched Paul Hollywoods series on bread making on the BBC and knew I had to buy his book. He was kinda shmoozy in an 'old guy fancies himself' type of way and I wasn't sure whether I found him attractive or not, so I continued watching and came to the conclusion that he was no Sean Connery, but this guy made bread making look pretty easy. I was all over it!
My friend Tracy and I used to have a 'Loaf off'. Sending each other photos of our latest creations, and it was fun and so much nicer than the store bought loaves
I was on a bread kick and it was great while it lasted, but it does command dedication. 
Once every 2-3 weeks now I make a few loaves of bread and my family love it. (Well, I think they do, but do I recall my brother and I being around 8 or 9 and pretending to like my mums brown bread, but proceeding to go and play outside and feed it to Deva (our German Shepherd). Sorry mum! I should check the chicken coop since they don't have a dog disposal at their service.)........

I digress...................//

This bread here was inspired by Paul Hollywoods Savoury Brioche . This bread is a showstopper! It looks impressive and tastes divine.

 
I had an abundance of beets one day and had roasted them all up, because I hate throwing anything out. Then I had an idea of a beautiful purple bread with a green filling oozing out. Ta-da.......in walks the Beet Brioche Couronne.

Sometimes when you bake with beets the colour seems to fade out during the cooking process, and we all hate it when that happens, don't we?  So here I blended the beets with the butter beforehand and it seemed to stain the butter a vibrant pinky purple colour which remained throughout the baking process. Result!

Beet Brioche Couronne
This is my white flour of choice

Serves 4-6
  • 500g Organic white bread flour
  • 10g Salt
  • 10g Fast action dried yeast
  • 150ml Tepid milk
  • 4 Medium free range eggs (+ 1 egg for brushing before the oven)
  • 200g Butter cut into small pieces.(at room temp)
  • 70g Cooked organic beetroots
  • 1 Block of cream cheese
  • 2Tbs Pesto
  • 1 Cup spinach
  • Grated parmesan (optional)

Butter and Beet paste
Blend the butter and beets in a food processor until thoroughly combined.  Set aside
In a separate bowl combine the cream cheese with the pesto and spinach and set aside.
Place the flour in the bowl of a stand mixer fitted with a dough hook. Add the salt to one side of the bowl and the yeast to the other.
Mix the eggs into the tepid milk and add it all into the flour mixture.
Run the mixer at speed 1 until all ingredients are incorporated. Then let it run for another 5-7 minutes to activate the yeast.
Next, drop the butter/beet paste into the dough a tablespoon at a time. Wait until every spoonful is blended in and then repeat until all the purple paste  used up.
Run the mixer at speed 2 for another 5 minutes.
Now this dough is going to be very sticky, but should still clump together in your mixer.
We then need to decant the gorgeous purple dough into a large well oiled container. This mixture is going to increase x 3, so make sure it has plenty of room. Cover will a lid or a piece of lightly oiled cling film, and place in a warm (18-22deg) room until it has tripled in size (about 2hrs).

After this time, flour a work surface and dump the dough out. It should be full of air and still a wonderful purple/pink colour.

We want to roll the dough out into a rectangle about 21" x 14". (Lets not be perfect here, look at my 'rectangle' below???) What we are aiming for here is to not knock the air out of the dough. So be as light as you can when you are rolling and if you end up with a hexagon then so be it!

Grab your cream cheese and pesto mixture and slather it on top of the dough with the lightest of touches. 
Now start to roll the dough into a sausage shape as neatly as you can.
 
 This is what it should look like once rolled up and it will seal itself with the cream cheese.

Take a knife and cut the soon to be bread into 2, lengthways, right down the middle and part them.

Join the two ends together at each end and start to twist in opposite directions until you have one long twisted looking rope bread. The filling is meant to ooze out, it adds to the gorgeousness later on.

Carefully move the dough to a big baking sheet and construct into a Couronne (French for crown)Now we need to let the bread rise once more.
Cover with oiled cling film and leave in a warm spot for 1-2hrs, until it looks fluffy and podgy like the one below.

 
Set the oven to 200deg C (392deg F) and give your bread an egg wash. At this stage you can sprinkle it with grated parmesan, but this will taint the pink colour, so I like to leave it off.
Bake in the oven for 25 minutes until the top is shiny and starting to turn a slightly darker colour.
Let cool slightly (or the cheese will leave your mouth with 3rd deg burns. I speak from experience!) and serve warm.
 

NB - The type of beets used will effect the colour, so go for organically grown and the deepest purple you can find.


Saturday, 12 March 2016

One Pot Lasagne

This is a wonderfully easy meal to make that will satisfy soup lovers, stew lovers and our Italian friends!
You can make this lasagne into a soup by adding more water to it, or keep it thick and cheesy like you've just stirred up a big dish of baked lasagne.  Either way it is a sure fire winner. I make this at our daycare and there are always clean plates with bellies full of helpings one, two and three!

Lasagne soup version dished up....

One Pot Lasagne :-
Feeds 6-8 adults / 24 pre-schoolers
  • 1 onion, chopped finely
  • 2tbs olive oil
  • 4 cloves of garlic, chopped
  • 3tsps of Italian seasoning (a mixture of oregano, basil, rosemary and thyme.)
  • 1 pack of ground turkey (400g)
  • 2 tins of chopped tomatoes (2 x 754g)
  • 1 tin tomato paste (2 heaped tbs)
  • 5 cups of broth (veg, chicken, beef)
  • 12 wholewheat/grain lasagne sheets
  • 1 cup of mixed cheese, grated (mozzarella and cheddar)
  • 1/2 cup cream
  • pinch of chilli flakes
  • salt and pepper

Fry the onion and garlic in the oil for 4 minutes then add in the seasoning and turkey. Fry till the turkey is coloured and starting to brown.
Stir in the chopped tomatoes, tomato paste and broth. Bring to the boil and reduce to a simmer for 10 minutes.
Pot lasagne version.....
 

Take the pasta sheets and break them up into 1-2 inch pieces. (I find smaller children prefer the pieces around an inch long) Drop them into the sauce mixture along with the chilli (if using) and season to taste.
Stir to combine and keep at a simmer for 12-15 minutes.
Check the pasta is done by stabbing a piece with a fork. It should be al dente rather than soggy.
At this point you could add more broth and take it to the next level with lasagne soup, or just keep it as is.
To finish, take the cream and 1/2 the cheese and stir it thought the lasagne.

For the daycare, I decant the lasagne into dishes and sprinkle again with cheese on top before serving. But at home, save on the washing guys, and just ladle straight from the pot and top with extra cheese.


Variations
Replace the turkey with beef , pork or chickpeas.
Make it vegan with chickpeas, vegan cheese and some coconut cream.
Cut out the cream and opt for a low fat cheese for a calorie conscious serving.
Add in grated carrot, kale, spinach or any other vegetable you have on hand at the tomato stage to increase the veg ratio.
 
 
This is a pretty easy, cost effective meal to serve at schools and daycares. Only one pot is involved and it is a one of those scoop and serve items. (always a winner!)
Many vegetables can be hidden or used up in this soup too, making it a great menu item to use up surplus veg from school gardens.
Average cost per adult serving $2/per pre-schooler 70c (based on turkey mince and ww past sheets)


Tuesday, 9 February 2016

Raw Nutella

This is a recipe I adapted from lots of different post around the www.com.  Many of them had a pretty huge qty of sugar added. Natural sugar in the form of Maple Syrup or Coconut Syrup, but still high in sugar regardless.
So here I cut the amount of maple syrup and added in coconut oil (has a little sweetness going on there and is really good for your to boot) and swapped water for milk. The water milk swap occurred when my 4 year old screwed up his face at the taste of this little jar of goodness. I loved it, but then I'm on that wagon, where I realise that mums Nutella doesn't have to taste 'exactly' like the actual Nutella. Try telling that to him!! So I had a little play around with adding in almond milk and hey presto.....................................shop bought Nutella taste approved by Fearghas! Whoop!


So here it is and please alter it to suit you or your kids needs. Add a little more sweetener, reduce the cocoa or keep the water instead of the milk.

2 cups of Hazelnuts
1/4 cup of Maple Syrup
3tbs of Cacao powder
1-2tbs of Milk (cows, almond, oat etc)
1tbs Organic Coconut Oil


Toast the hazelnuts in the oven for 10mins @350def F.
Pop them in a food processor for 5-10mins, scraping down the sides as the nuts break up.
Once you have a nut paste, add in the maple syrup, cocoa and coconut oil. Blend to incorporate and then gradually add the milk till you have your desired consistency. I like it not too thick, but thick enough to melt on hot buttered toast.

Spread on toast, mix into hot chocolate, add in more milk to make a nutty sauce for pancakes.................or just spoon it right out the jar!

This keeps for around 2 weeks in the fridge. It does spoil as it doesn't have a high sugar content. It wont last that long though, especially if your kids get their hands on it.

Enjoy.....

Sunday, 24 January 2016

Alphagetti Soup

This soup was our overall winner at the school Taste Testing Day. And deservedly so.
 

It such an easy soup to make and the taste is not so much a standard can of Heinz tomato soup, but a bowl of tomato soup fragrant with rosemary and parsley, with deep pockets of garlic and little morsels of letters bursting on your tongue........can i add a 'woosh of hollihocks' in there too, as it did feel like opening up a good bottle of Cabernet, with the whaft i got from the soup pot.
 
This recipe was brought to our taste testing day by my lovely friend Selene at Little Foot Yurts
The only addition here was the cup of Kombucha. I added this because my OH groans that tomato soup gives him heartburn. And i couldn't have him missing out. So in my totally bizarre thinking, i thought ......hmm Kombucha is good for the stomach so it might counteract the acidic tomatoes. Did it work? Yuppity yup! Now I'm not saying it will work for everyone, but it done the trick with my husband and adding Kombucha to anything is going to improve the probiotics nature of it, so its a win win. 
 
 
(a post will follow shortly about the benefits of Kombucha and how easy it is to add into your daily routine. Its awesome!)
 
Ingredients:-
Serves 6-8
  • 3tbsp Extra virgin olive oil
  • 1 Large onion, peeled and chopped
  • 6-8 cloves of garlic, peeled and chopped
  • 2tbsp tomato paste
  • 1 Tin of crushed tomatoes (796ml)
  • 1 Tin of white kidney beans
  • 5 Cups vegetable broth
  • 1/2tsp Dried rosemary
  • 1/2tsp Dried parsley
  • 1tbsp brown sugar
  • 3 Cups of cooked alphagetti (cooked until still firm)
Heat oil in a large soup pot over a medium high heat. Add the onion, garlic and a pinch of salt. Cook, stirring occasionally until the onion is soft, about 5 minutes.
Add the tomato paste and cook for 1 minute, stirring all the while.
Pour in the canned tomatoes, beans, broth, rosemary, parsley and sugar. Stir to combine.
Bring to the boil and reduce heat to a simmer for around 20 minutes.
Cool slightly and process with a stick blender or food processor until thick like pasta sauce.
To serve, ladle up into bowls and top with the cooked Alphagetti.

Notes/Alternatives - You can replace the beans with chickpeas, lentils or another legume of your choice.
Keep the soup thick and use it as a pasta sauce.
You can also add all the above ingredients (except the pasta) to a slow cooker and cook on low for 6hrs, then blend and add the cooked pasta.

Basic soup topped with Fenugreek sprouts . GF version.

  •  
 

Thursday, 7 January 2016

Peppermint Chocolate Chunks


These little morsels of heaven are great for a little pick me up snack with your brew of choice, or great for a nibble at your fancy dinner party.

Peppermint infused into coconut oil with lashings of raw cacao powder. Whats not to like???


  • 6 Tbsp Coconut Oil
  • 4 Tbsp Organic Raw Cacao Powder
  • 4 Tbsp of Nut butter. (Almond, Peanut whatever you have on hand)
  • 2 Tbsp Local Honey
  • 1 Vanilla Pod, or 1 Tsp Vanilla Bean Paste
  • 1 Tsp Peppermint Extract
  • 1/2 Cup Unsweetened Shredded Coconut
  • 1/2 Cup Pecans (or nuts you have on hand)
  • Pinch of salt
Add all ingredients, except the nuts and shredded coconut, into a glass bowl. Mix to combine. Set this bowl over a pot of hot water to melt it all oozingly together. This will only take a couple of minutes. (Alternatively, microwave in 20 second zaps until everything is melted.)
Chop the pecans.
Add pecans and coconut to the melted mixture and stir.
Pour into a tin or glass container lined with parchment paper. The depth of the bites should be around 1" thick.
Freeze your slab of goodness until the chocolate is set. Remove from freezer and score the chocolate with a sharp knife into sizeable pieces to pop into your mouth, and slowly and carefully cut right through.

NB - The coconut oil in these will make them melt at room temperature, but in all fairness, these wont last long in any room of any temperature!
Also, coconut oil taken in large quantities may have you making one too many bathroom pit stops.
Eat in moderation..............................................yeah right!

Wednesday, 6 January 2016

Easy Peasy Guacamole


One of my boys likes avocados, the other detests them. It just goes to show, you can feed kids the same foods growing up but with our gazillion tastebuds in our mouths, we're all going to have different sensations going on.
For some of us, sour buds explode when tasting grapefruit, others think it tastes like a slightly bitter/sweet orange. Some need salted chips (fries) while others rarely use any seasoning.
We are all different outside and in. Try and keep that in mind when your kids try new things.

They do say though, eat/drink something 20 times and your going to acquire a taste for it. I think i was like that with Guinness, red wine and whiskey! It does go to show perseverance is key. :o)
 
I do love avocados and they were one of THE most popular foods of 2015! They are used in everything from smoothies to pasta sauce, to the most amazing toast toppers. ( not forgetting face masks too) They are an extremely versatile fruit and definitely warrant their popularity.
 
Why are they so fantastic? Well they are packed full of vitamins and fibre and contain more potassium than a banana. They are high in fat, but the majority of this fat is from oleic acid.
Oleic acid has been linked to reduced inflammation and been shown to have beneficial effects on genes linked to cancer fat.
This fat is also used to extract optimum antioxidants from fruit and vegetables in our guts. Pretty cool eh?
Lots more fascinating Avo facts here.
 
This dish takes all of 5 minutes to prepare and you can totally play around with seasoning and flavours to suit your audiences tastes.
 
Easy Peasy Guacamole
 
  • 2 Large Avocados
  • 2 tbsp plain yoghurt or sour cream
  • 1 tsp lemon juice
  • Salt and pepper to taste
  • Optional
    Sprinkling of chilli flakes or
    1/4 tsp cumin powder
Mash avocados and add in yoghurt and seasoning. Serve immediately.
Avocados turn brown once opened, but the lemon juice should help it remain green for some time after its mashed.
Use this as a dip for nachos or put it on your scrambled eggs or plain buttered toast. You could also put it on your face, minus the salt and lemon, and use organic yoghurt, if you could resist not licking it off!  There are many ways to use avocados and I'm sure in 2016 they are gonna be just as popular as last year.
 
Hit me back with your favourite ways to use this green goddess......................

Thursday, 17 December 2015

Slow Cooker Sweet Potato Curry

Its that time of year again when our slow cooker is on overdrive. I never really fancy using it much in the summer , but as soon as the thermometer hits zero degrees, the trusty crockpot is dusted off and filled a good few times a week.
This recipe i originally found on Deliciously Ellas website. She's a wonderful foodie/blogger in London, who's made an empire of getting good food vibes spread across the globe.. Check out her website Deliciously Ella and her latest business venture here The Mae Deli (I wish I lived in London to sample some of the goodies they create there)

This is my slightly adapted version which goes into the slow cooker in the morning and is ready when you come home from work. Ta Da!
There is nothing like opening the front door after a long day and the smell of curry hits you on the nose, making you feel like Jamie Oliver is in your kitchen ready to pour you a glass of Shiraz while he serves up a steaming plate of yummy goodness. ......And back in the room Rachael! Ahem. Regardless, its so effortless and makes the winter nights a little more bearable.


Ingredients:-

  • 1 can of chopped tomatoes (796ml or 2no 400ml cans)
  • 1 can of chick peas (400g) drained
  • 2 medium sweet potatoes chopped into inch pieces
  • 1 Aubergine (aka Eggplant)
  • 1 small can of tomato puree
  • 1/4 cup Kombucha Vinegar / apple cider vinegar
  • 2 level Tbs ground turmeric
  • 1 1/2 tbs ground cumin
  • 4 cloves of garlic chopped finely
  • 2 cups of chopped kale or spinach
  • 1 cup of green olives (de stoned)
  • chilli flakes
  • salt and pepper
  • 1 can coconut milk
Alternatives - Leave out the aubergine. Add in frozen peas or parsnips (bumping up the sweetness). Olives aren't everyones cup of tea (my kids love them). Just leave them out, no biggie. You could also add in 2 breasts of chicken and leave out the chick peas. Swapping protein for protein.  Lots of variations on this one. Do what suits your family. I personally don't think you can go wrong with swapping veggies and proteins.


Put all of the above ingredients, except the coconut milk, in the slow cooker. (add the chilli flakes to your personal preference. A pinch is enough to give it a little heat) Give it a good stir around to incorporate all the flavours. Set the slow cooker to low for 6-8 hrs. Before serving, add the coconut milk and heat through.(around 5mins)
Garnish with a dollop of coconut yoghurt (or normal if your not dairy free), or just add a sprinkling of chilli flakes.
Serve up with brown rice, quinoa or get in and scoop it up with a whole wheat naan bread. 


This is perfect on its own, but for kiddos they need a little added grain in there, the naan bread being the easiest, quickest option.


If you choose to add organic into your meal, please choose the sweet potatoes. Potatoes are always on the 'Dirty Dozen list', partly due to the way they are harvested with chemicals.  Try and keep it clean!


(side note.............Walmart Canada has 2lb bags of Organic Sweet Potatoes on for 97c! Now I'm not the biggest Walmart fan, but if it means I can feed my family 'cleaner food' and it doesn't cost me the earth, then I'll be shopping there. Out of season of course)

Monday, 14 December 2015

The baguette bake

I give you the famous Baguette, aka a French stick.
I am one that thought the best use of this said stick was to slice it, cover it in salted butter and dunk it in soup. YUM! Although this must be done on the day of purchase, otherwise it becomes a deadly weapon in our household!
Nevertheless, bread going hard is a great sign of little or no preservatives in it. Bread getting softer and softer before it becomes a fantastic source of penicillin will more than likely have an extensive list of unidentifiable ingredients!
I'm not judging, I have a freezer full of bread from the 2nds bread shop ( bread that is nearing its use by date) with a fair bit more than 4 ingredients. I have a carb monster husband and I will not trade him in for a fresh sourdough round that costs me $5 a time. ( well not yet anyway). I will become that wife who bakes her family bread everyday of the week. .........I am working on this, but it is a very ...........................very gradual process. Easy bread recipes coming soon.

But back to my trusty stick.

I turned a large baguette into a lunch item for my daycare the other day and all it took was 20 minutes prep and 25 minutes in the oven! The kids loved it and I think you and your families will too.

The ingredients list consisted of :-
-Tinned Tuna (protein)
-Cheese ( dairy)
-Peppers and green onion (fruit or veg)
-Wholegrain baguette ( Grain)
Safe to say i think these ingredients are pretty cost effective and you could whip this up for a family dinner too, knowing that you hit all the food groups and it didn't cost the earth. Swap out the peppers for your kids fav veg. Sweetcorn, spinach, peas etc.

In a school environment, this would be cool cut up into serving sized pieces and wrapped in tin foil like a cracker to serve (and keep warm). Kids would dig it.

Tuna Baguette Bake
3 Cans of Tuna ( in water)
5 Spring onions, chopped
1/2 Pepper, chopped finely
3/4 cup Grated Cheese (the stronger the better. and add more cheese if you like it very cheesy!)
1/2 cup Mayonnaise
1tbs Apple Cider Vinegar
Salt and Pepper to taste.

Drain the tuna and add in all the other ingredients., saving a little cheese for the top. Mix thoroughly.

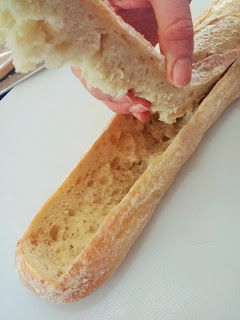
Cut a rectangle the whole length of the bread around 1" deep. Pull the cut bread back and dig a little in with your fingers to scoop some bread out and make a hollow in the loaf.

Set the scooped out bread to the side.

Fill the baguette with your filling and sprinkle with the remaining cheese.

I don't like waste, so I replace the top part of the bread back on again and squish it down. But this makes for a slightly messy cut when your ready to serve as the top gets quite hard. But it taste amazing regardless. Otherwise, bake the top part separately and grind the toasted bread up in a food processor and you've got ready made breadcrumbs!


Heat in a 350deg oven for around 20 minutes, or until the cheese is all nice and bubbly.
Leave to cool for a few minutes and then slice to your desired thickness, or if you've made one for your very own, just wrap your chops around it and thank me later!


I'm sure there any many variations on this , let me know you're stuffing your bread with.  My next one to try is eggs and bacon!  Breakfast baguette for a lazy Sunday morning.....................


Wednesday, 4 November 2015

Fishermans Rainbow Pie


I had a fun day at the daycare today using lots of produce to create colourful rainbows for the kids to eat.  We had bags of beets, sweet potatoes, peas, sweetcorn, apples, pears, bananas and the list goes on.  I'm very lucky to have so much fresh produce at my finger tips in the kitchen.

On our lunch menu today was fish.
We have to serve fish once a week at the daycare under the government guidelines.  The only exceptions being if the children are vegan or vegetarian. Some kids don't care for fish, and would rather be a veggy on these days, but we have to offer it anyway.  So my job is to make it taste as wonderful as possible, and I think I nailed it today.

I used haddock for the fish part and steamed it in the oven first. The I lightly fried it in oil for a couple of minutes with sweetcorn to get the juices going. I then added Almond milk (we have a gluten and dairy free guy we are catering for today) and corn flour,sprinkled with turmeric, to make a lovely creamy yellow sauce.  The next layer was mushy peas! I know, I know , the things nightmares are made off .( or is that just me?)  But these peas tasted soooooooooooooooo sweet blended up with non dairy margarine, almond milk and a sprinkling of salt.  Now if I can eat these and think YUM, anyone can!  This incredible hulk layer goes on top of the yellow layer. I then added mozzarella cheese (dairy free cheese to our little dairy free guys portion). The top layer is made by the one and only 'Sweet potato' or 'Kumara' as they call it in Australia and NZ.  All we did here was boil to tender and blend with non dairy margarine and almond milk with a touch of salt and pepper. Spread on top to complete your rainbow. Voila!  I then baked it in the oven to bring it all together.

The Verdict :- The pre-schoolers weren't too impressed with the 'Hulk' layer, but those that did try it, asked for seconds, but there were a few that just picked and prodded. But that's not unusual for them. All it takes is one kid to say 'Ewwwwwww' and then its a domino effect.  Everyone is Ewwww'ing and nothing gets eaten. But I've learnt to have pretty thick skin and still come back day after day with new creations and ideas with just as much enthusiasm. I love food and I love kids eating good food, I WILL NEVER GIVE UP!  BUT......................and that's a huge BUT, my toddlers (18months to 3yrs) LOVED it! I mean they scooped this up, plate after plate, so much so that I had to go and steal more from the pre-schoolers that were Ewww'ing. Now that is what I call satisfaction. It made my heart warm. And even the teacher (she whispers....who doesn't like fish) had a big plateful. 

So go for it and try it, you WILL be pleasantly surprised.


Here is my recipe for a family of 4. If you work in a daycare or school environment, just scale it up.

  • 2 Pieces of white fish. (Sustainable fish local to where you are from is even better)
  • 2 Sweet Potatoes (Roughly the size of your hand)
  • 1 Cup of frozen sweetcorn
  • 2 Cups of frozen Peas
  • 1tsp Turmeric (organic if possible)
  • 3 Cups Almond Milk (or full fat whole milk)
  • 1 Cup margarine (or butter)
  • 1tbsp Corn Flour
  • 1 Cup of mozzarella/non dairy cheese
  1. Cook frozen fish according to the instructions. Or bake for 20minutes at 350def F until flakey if using fresh.
  2. Peel and chop sweet potatoes and pop in a pot filled with water and bring to the boil. Then turn down to a simmer and check potatoes after 15mins. What your feeling for is tender, but not too soft. Drain and puree with a stick blender with 1-2 tablespoons of margarine/butter (I like mine buttery so I tend to add more) and 1 cup of almond milk/whole milk. Set aside.
  3. Flake the fish and fry it up with a little oil of your choice in a frying pan with the frozen sweetcorn.  After 4-5 minutes add 1 cup of almond milk/whole milk, a tablespoon of corn flour and the turmeric. Cook on simmer for 3-4 minutes to thicken up.  Add more milk if required to make it a thick sauce. Pour this layer into an oven proof dish.
  4. Cover the peas with cold water and bring to the boil. Simmer for 5 minutes. Drain and blend with a stick blender with 1 tablespoon of margarine and most of a cup of almond milk/whole milk. You want it wet enough that it is easily pureed with the blender. Season with salt and pepper if required.
  5. Now layer the 'Hulk filling' on top of the fish. Just dollop it on and spread it over with a fork. Then add mozzarella and dump the sweet potato on top to finish. Spread over with a fork, or if its nice and smooth, pour it on.
  6. Pop in the oven for 30-35 minutes @ 350deg. Let cool slightly before serving little mouths.


The hard part of following government guidelines for educational facilities is that, when you make a meal like the one above, they encourage you to add a bread roll to tick the 'Grain' box.  We have asked the question, "Can sweetcorn be classed as a grain". Currently we are waiting on comment back. I'll keep you all posted. But this would be fantastic if it were classed as a grain. Schools , in my opinion, put costs before nutrition. I understand that, I truly do. There isn't a whole lot of budget in the school system for food at all. So when they look at the meal above, $$ signs are rolling in there eyes and then I ask them to put a bread roll on the side!?  They would rather just give a bread roll with a fish finger (aka fish stick) on it, with a side of veg.  And I understand that too. But that doesn't mean I have to like it.
The purpose of this blog is to give information to educational facilities and families to try and make it easier to provide 'Good Food' that fits into the 'current' government guidelines.  It should be exciting for our chefs at work and our cooks at home, not daunting!


(ps...........please excuse my photos on this one. It was a quick snap before I ran lunch out. But any comments on how to take great blog photos would be fantastic. Thanks)